Playing keyboards live, or honestly, performing anything where you are trying to fill the sound out often requires that you play more notes then you have fingers to play. That is why the chord trigger in mainstage is so useful. You are able to use one hand to play pads or chords that you choose and play a melody with your other. Setting up an Ableton chord memorizer is ABSOLUTELY DOABLE. Here is what you will need to get the job done.
- Midi Effect Rack
- Chord Plug-In
- Instrument Rack
Luckily, these are all included with Intro, Standard, and Suite versions of Live, so no matter where you are at, we are in business. If you need just a standard keyboard split with no chord triggers, you can check out my previous post here. If not, onward and upward.
Creating An Ableton Chord Memorizer Without Max For Live
Step 1
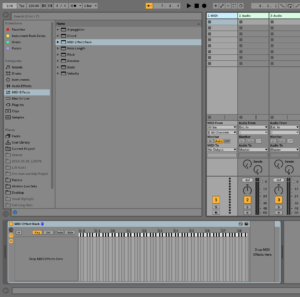
Navigate to the Midi Effects category in your browser, choose midi effect rack, and drop it onto a Midi Channel Strip.
Step 2:
Create Several Midi Chains by right mouse clicking on the “insert midi effects here” area, and selecting “Create Chain”.
I am going to create 4 chains, however, you can create as many chains as you need chords to trigger.

Step 3:
Select which notes will act as triggers
Make sure the key menu is selected and move your chains to allow a single note per chain to pass through. I will be creating a vi-IV-I-V progression in the key of C. So for me, I will have chains for the notes A, F, C and G

Step 4:
Add your chord plugins to each chain.
Select your first chain by clicking on it. Drag and drop a Chord plugin from the midi effects category of your browser on your first chain. Repeat this process for each chain.

Step 5.
Program your chords.
The chord plugin works by taking your incoming note and transposing it up by 1/2 steps according to the number you set. For example, if shift one was +2 Ableton would play your original note plus the note a whole step higher. If you play a C, it would play that note as well as a D. It’s also important to note that each shift is based off the original note you play. So a major chord could be created for example, by playing C and setting shift one set to +4 and shift two set to +7. We want a full pad sound, so the note we play will act as our bass note, and the triggered notes will happen an octave higher.
You can program your chords to be anything you want, but I have set mine up to have nice voice leading in the context of my vi VI I V progression. My settings are as follows
vi
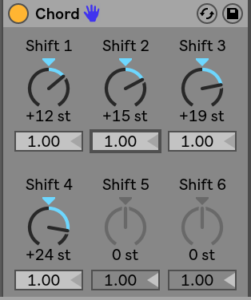
Shift 1 +12
Shift 2 +15
Shift 3 +19
Shift 4 +23
IV
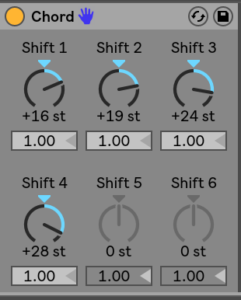 Shift 1 +16
Shift 2 +19
Shift 3 +24
Shift 4 +28
I
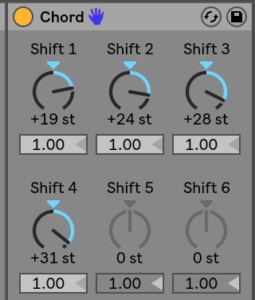 Shift 1 +19
Shift 2 +24
Shift 3 +18
Shift 4 +31
V
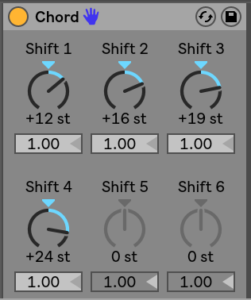 Shift 1 +12
Shift 2 +16
Shift 3 +19
Shift 4 +24
Step 6
Add your pad sound
From your browser, select the sound you would like to have playing chords. Drag and drop that sound directly to the right of the midi effect rack.

Pause for a minute!
You have just created an Ableton chord memorizer for your left hand! We’re almost done. Now, all we need to do is set up a key range split so you can put that trigger to good use and get some melody going on the top right side of the keyboard!
Step 7
Group the midi effects rack and your pad into an Instrument rack.
Select everything in your device window by clicking on each item while holding shift. Once everything is selected, right mouse click and select “group”.

Step 8
Navigate to the “Key” menu of your newly created instrument rack, and drag the chain to cover only the portion of the keyboard you will be using to trigger your pads.
Remember, this is only the range you will use for INPUT, the instrument itself will play any notes you previously set up in the midi effect rack.
Step 8
Add your lead sound to the instrument rack, and adjust the range.
You have created an Ableton chord memorizer! This is a super useful tool to level up your live performance in Ableton. I’d love to see what you’ve created. Share it with me on Twitter @MStoAbleton
