I need to start out by saying, Ableton is not MainStage. It does, however, have the ability to do all of the same things, and way more.
MainStage is created to play patches. Ableton is created partially to play patches, and partially as a program for music production.
You can think of Ableton as Logic Pro, but with integrated features that allow for playing and switching patches in real-time.
I’m going to walk you through how to get Ableton Set up like mainstage here, but if you’re ready for a deep dive into all the ways you can use Mainstage just like Ableton, Click here and buy a copy of my complete transition course
The Six Stages Of A Patch List
Phase One: Get Familiar with the song
Pay special attention specifically to…
- What types of sounds are used.
- Where where sounds sit on the keyboard.
- Sections that will need extra programming to execute. (I.e. chord triggers, pitch shifting and the like)
Phase Two: Choose your sounds
Before you start building a patch list, you will want to know specifically which sounds you will be using. You can think of this as pulling out the necessary ingredients for a recipe.
Find the sounds you want to use, and save them to your user library for easy reference in the future.
Phase Three: Compile your devices
In this phase, you will set up all the devices you need for your patch list to serve you while you are playing live. Completing the first two phases thoroughly will give you clear vision for exactly what you need to do in phase three. This often includes Chord Triggers, Pitch Devices, and setting ranges.
Phase Four: Divide And Conquer
In phase four, we will separate our sounds by sound type, and put our sounds into instrument racks
Phase Five: Write Your “Dummy Clips”
In phase four, we will create “Dummy Clips” that allow you to move between all your different sounds and settings. You can do this quickly using the “Two Click Method”.
Dummy clips contain messages that allow you to control any parameter inside a given channel strip. This includes turning sounds and effects on and off, changing volumes, and changing patches.
Phase Six: Put Your Clips In Order
This is where you take all the hard work you have done, and order your clips in a way that makes sense for your song. It makes sense to do this as the last step because it will allow you to quickly switch out your options, without needing to create and new clips.
Build a Patch List With Me
This is a great way to get started with building patch lists, but if you are ready for a full powerful understanding of patch lists in Ableton, make sure you grab a copy of my Mainstage To Ableton Complete Transition Course.
There, I will walk you through set lists in this style as well as show you how to build two other types of patch lists. In addition, it comes with 10 great patches, and some other goodies.
—>Click Here To Join My Course<—
Today, I am building a patch list for “Counting stars”, by One Republic
Phase One: Get Familiar With The Song
Here is the music video. Listen through the song. Jot down some notes. Remember to pay attention to…
- What types of sounds are used.
- Where where sounds sit on the keyboard.
- Sections that will need extra programming to execute. (I.e. chord triggers, pitch shifting and the like)
Here are the notes I jotted down. You can compare them to your own to see how you did.
Piano, Organ, And A Lead Synth sound are used.
Piano has a rhythm part
Organ serves as a pad
Lead sound lives on it’s own in the upper register.
For programming I need:
- A chord trigger so I can play the piano part one handed
- A chord trigger and a transposition tool so my organ can be triggered by the piano part
- A small zone for my lead synth.
Phase Two: Choose your sounds
You can use any sounds that you have in your library. Any piano, organ, and lead synth sound will work. So if you have one that you really like. Go ahead and choose those sounds. Here are the sounds I used, for reference.
Piano Sound: I am using the Power Chords Piano for the piano part. It’s one of my favorite sounds and you can grab your own copy of it here.
Lead Synth: I am using a lead synth that I created using Wavetable. You can download that preset here as well if you’d like.
Organ: For the organ sound I am using the Tonewheel organ sound from the Ableton Pack, “Electric Keyboards”.
Phase Three: Compile Your Devices
Have you ever heard the phrase, “Eat the ugliest frog first”?

Its a clever way to say, “Start with the hard part, than move on to whats easy”. That’s how I like to create my patch lists
I know that I will need to create:
- A chord trigger so I can play the piano part one handed
- A chord trigger and a transposition tool so my organ can be triggered by the piano part
- A small zone for my lead synth.
The chord triggers are the ugliest frog in that list, so lets start there.
Creating The Chord Trigger
Mainstage’s chord trigger allows you to assign a single note to trigger any number of notes across the keyboard.
The same is possible In Ableton by using the midi effect, “Chord”, and assigning each instance of “chord” to only one note.
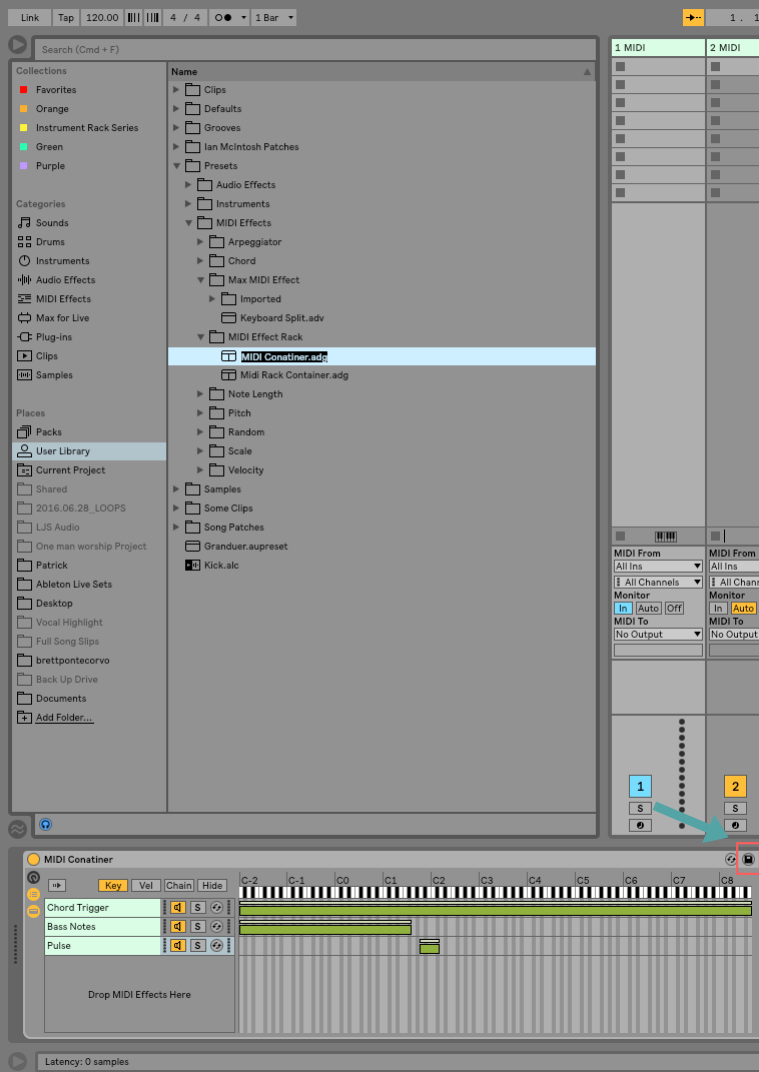
Once we create it, we can save it as a preset to use over and over again.
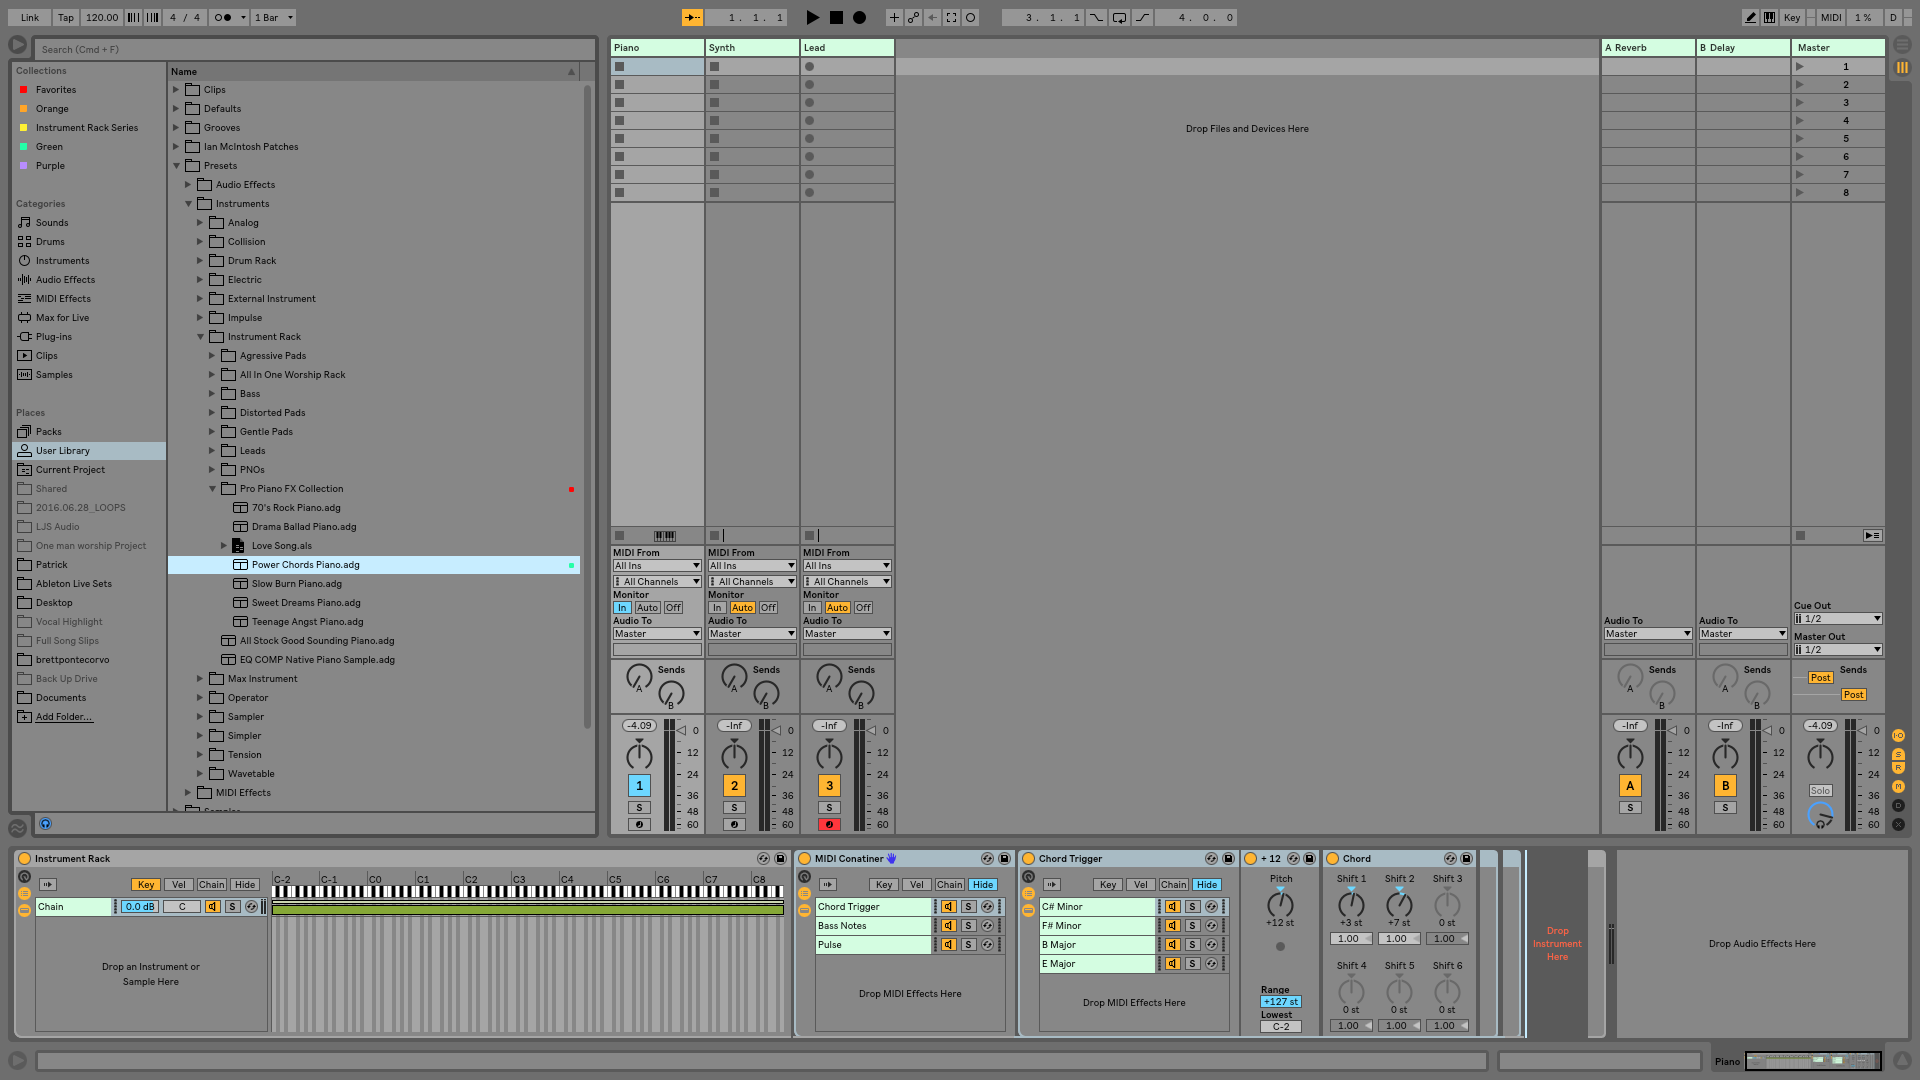
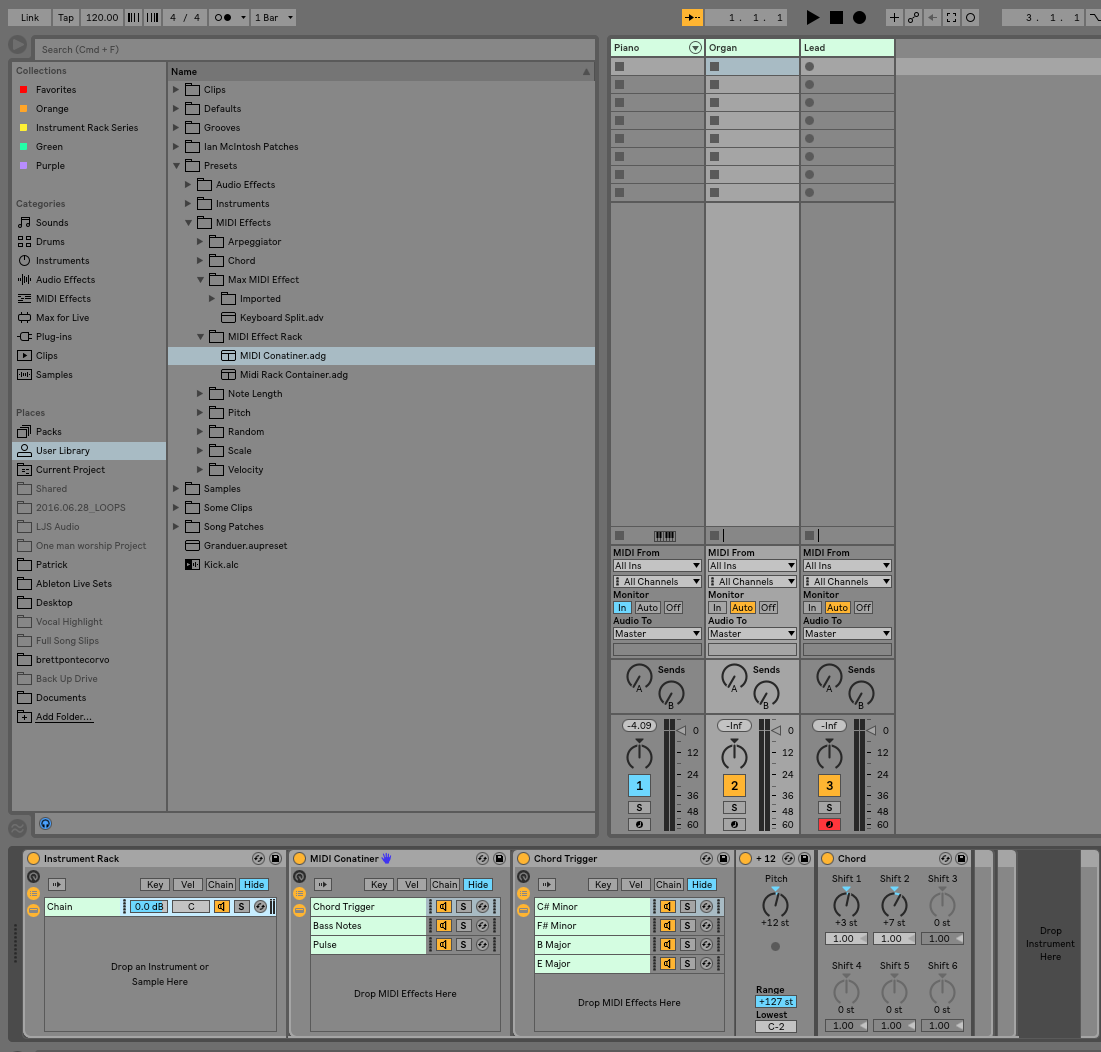
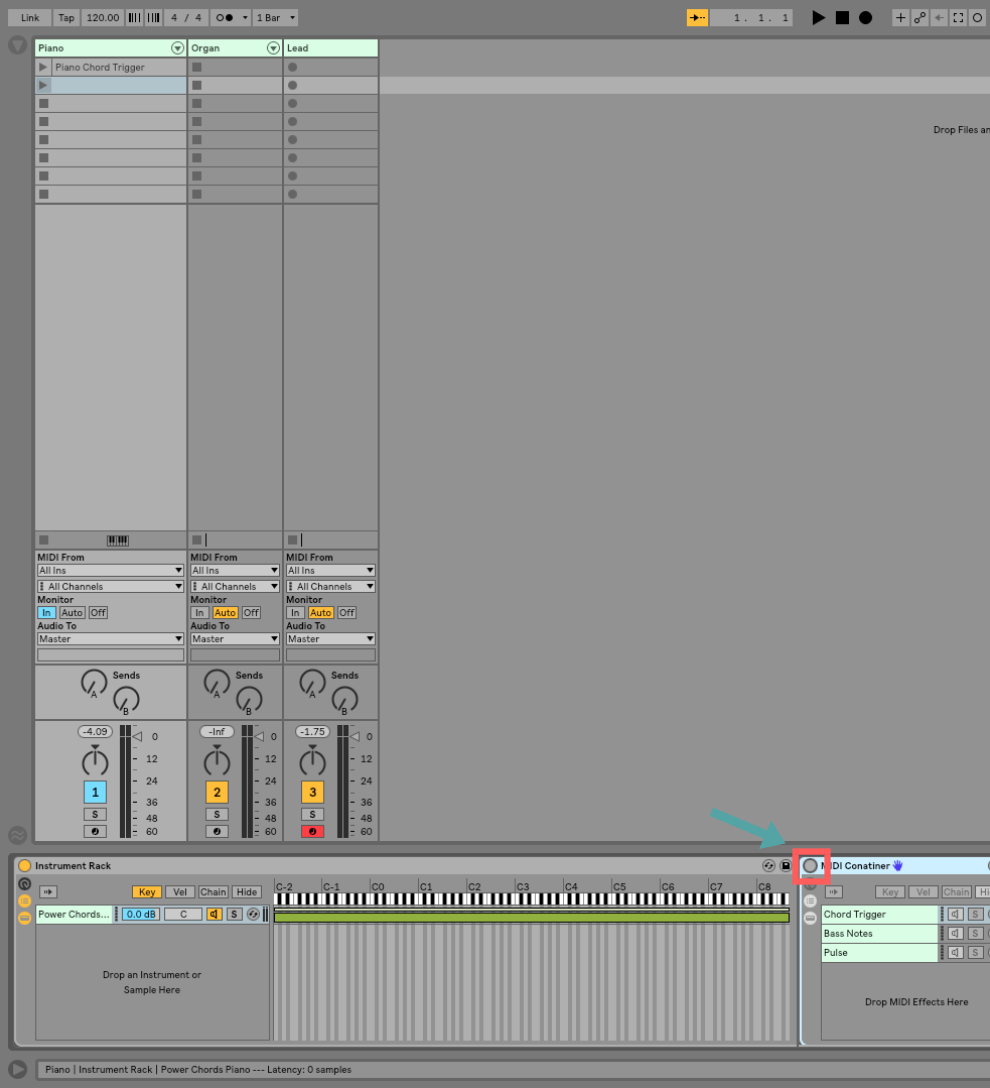
Add a midi effect rack to a blank Channel.
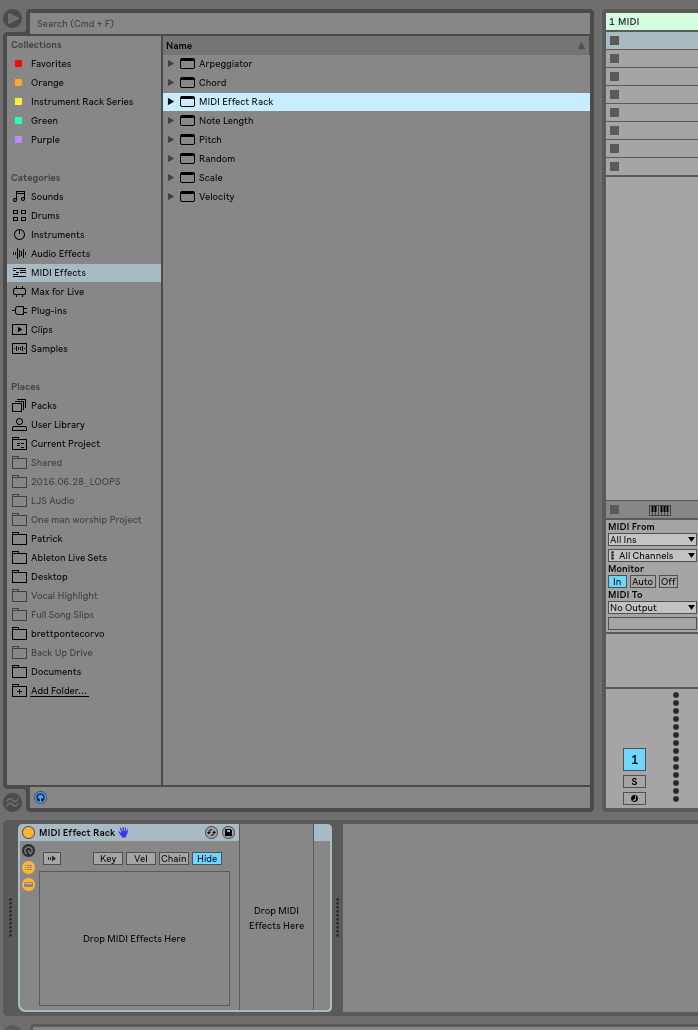
Rename The Midi Effect Rack, “midi container” by right-mouse-clicking on the midi Effect Rack and choosing, “Rename”.

Add an additional Midi FX rack into that one. Rename It chord Trigger
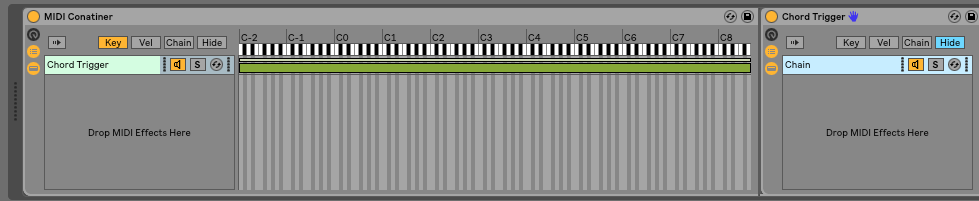
Drop a +12 pitch plug in into the chord trigger rack
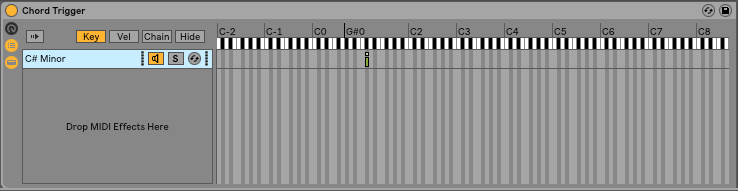
Add a chord device after the pitch plug in, Set the intervals to 3 and 7

Rename the chain, “C# Minor”, by right-mouse-clicking the chain and choosing, “Rename”.

Click the key menu to reveal the key range of the midi effect rack.

Drag the green chain all the way to the left side of the screen, resizing it to only take up one space.
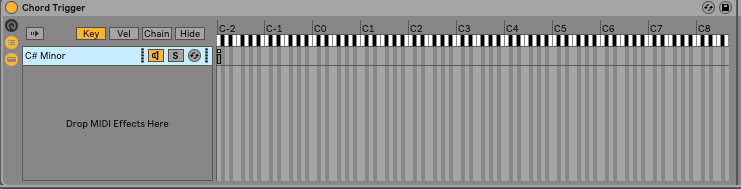
Click the green chain, and drag it to C#1. Rename the chain C# Minor
Duplicate by clicking the chain, and pressing command D on your keyboard

Move the Chain To F#

Rename the chain, “F# minor”, and duplicate the chain by pressing command D on your keyboard

Change Shift 1 from +3 shift +4

Drag the chain to B, and rename it, “B Major”.

Duplicate by clicking the chain, and pressing command D on your keyboard

Move the chain to E and rename it, “E Major”.

Right mouse click in the midi container Midi FX rack and create a new Chain
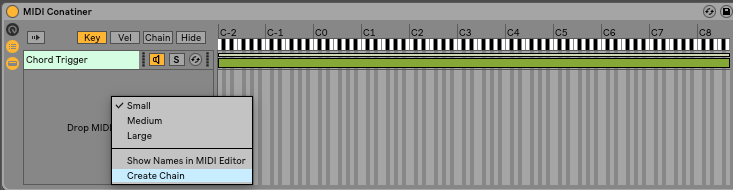
Rename your new chain, “Bass Notes”, by right-mouse-clicking the chain and choosing ,”Rename”.
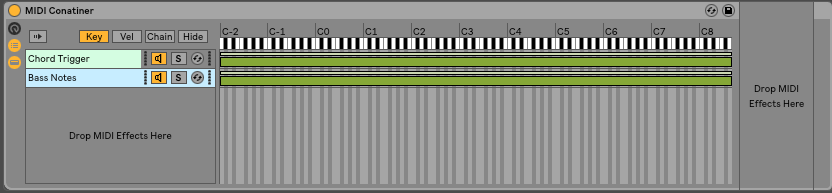
Adjust the green range zone to span from C-2 to F#-1

Create another chain in your midi container and rename it, “Pulse”.
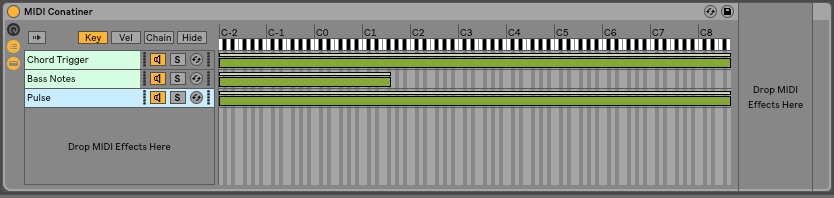
Adjust the range to go from A1 to C#2
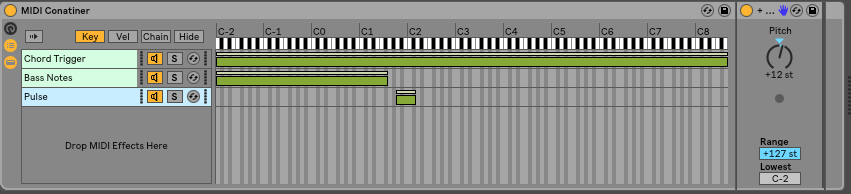
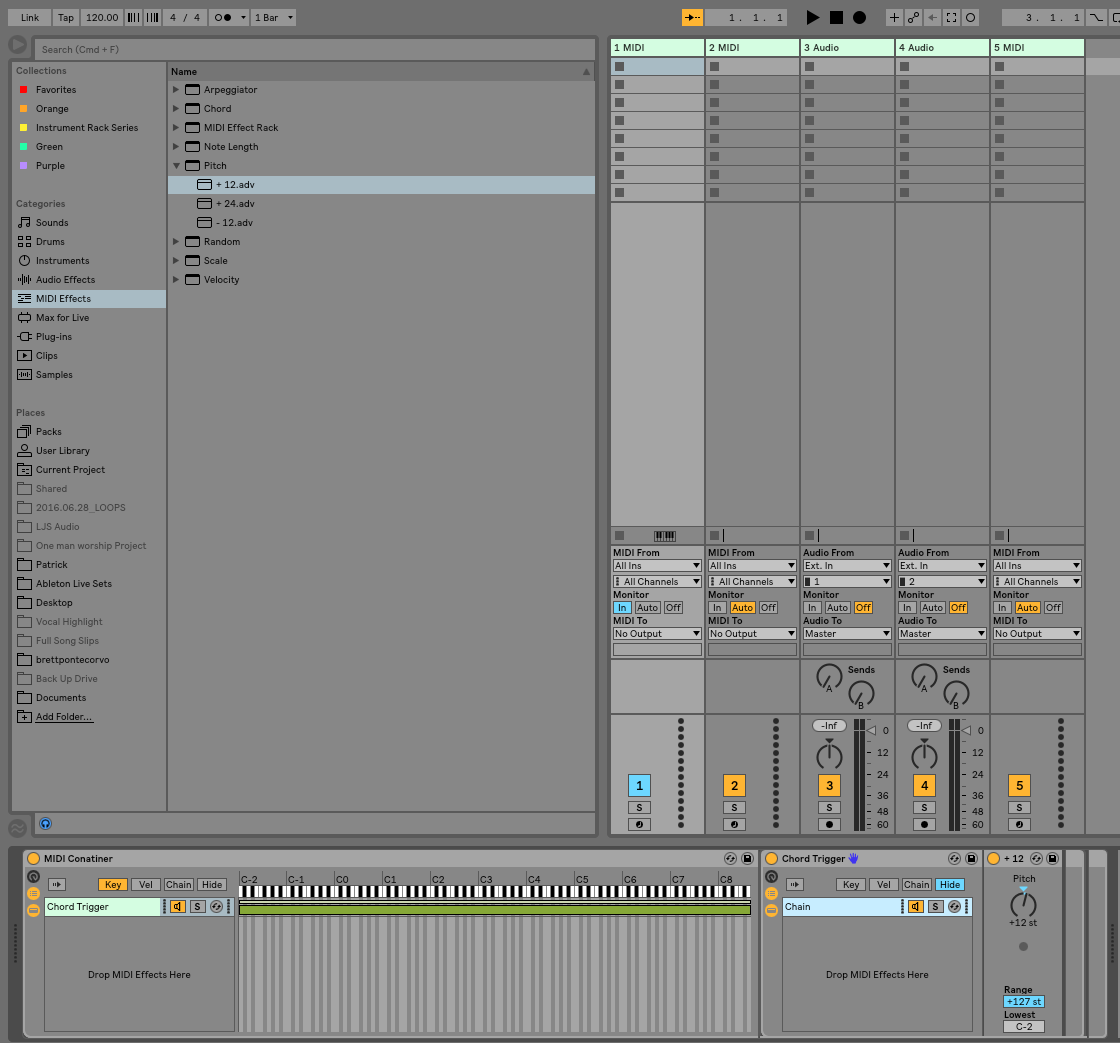
Add a +12 pitch device to that chain. Directly after that, add a chord device with the first shift set to +12

Save the Midi Container as a preset by clicking the little lock to the top right corner of the midi container.
N
Phase Four: Divide And Conquer
In MainStage, you can scroll through sounds by selecting the patch name on the left of the screen. When you’re using Ableton like Mainstage, we need to use instrument racks to accomplish the same thing. We will also separate out our instruments into categories to prevent redundant audio effects.
Instrument racks allow you to:
- Easily layer sounds
- Smoothly transition between sounds without any cut offs
- Assigning macros makes adjusting your patches faster by bringing commonly needed parameters to the front of the rack
- Allows you to easily set the playing range of your sounds
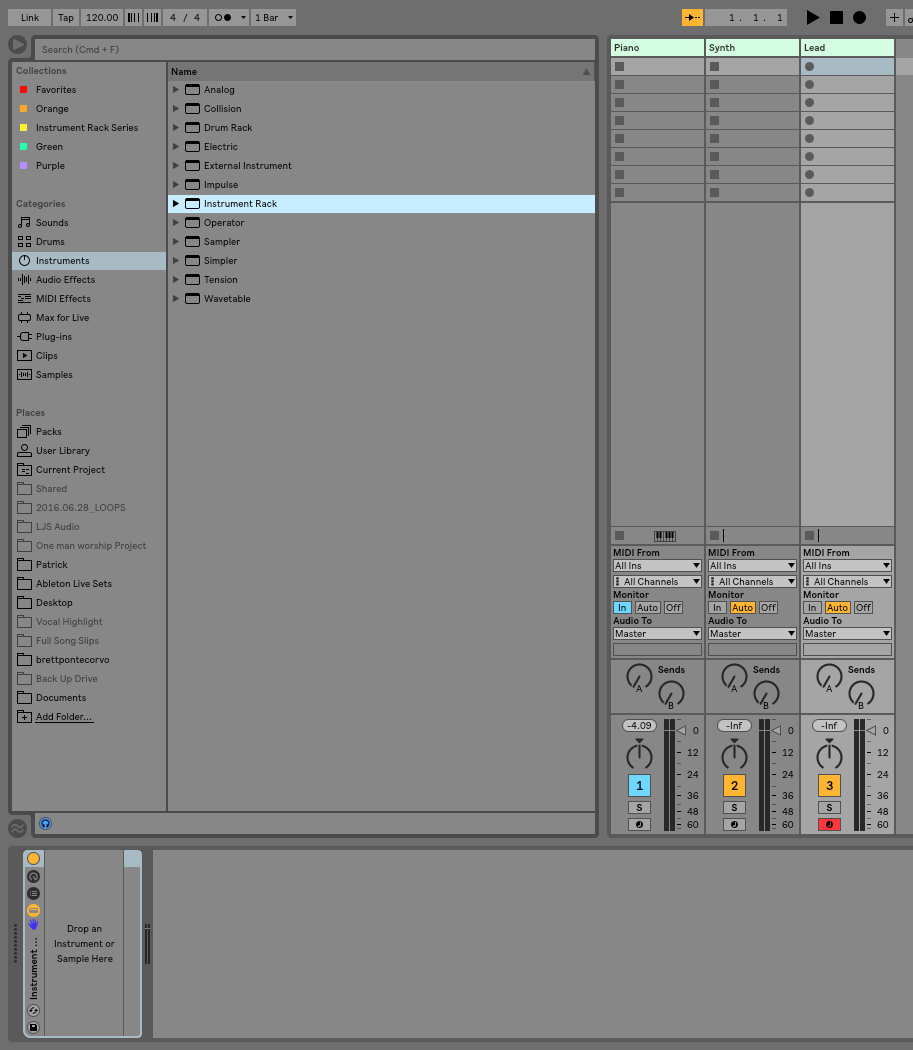
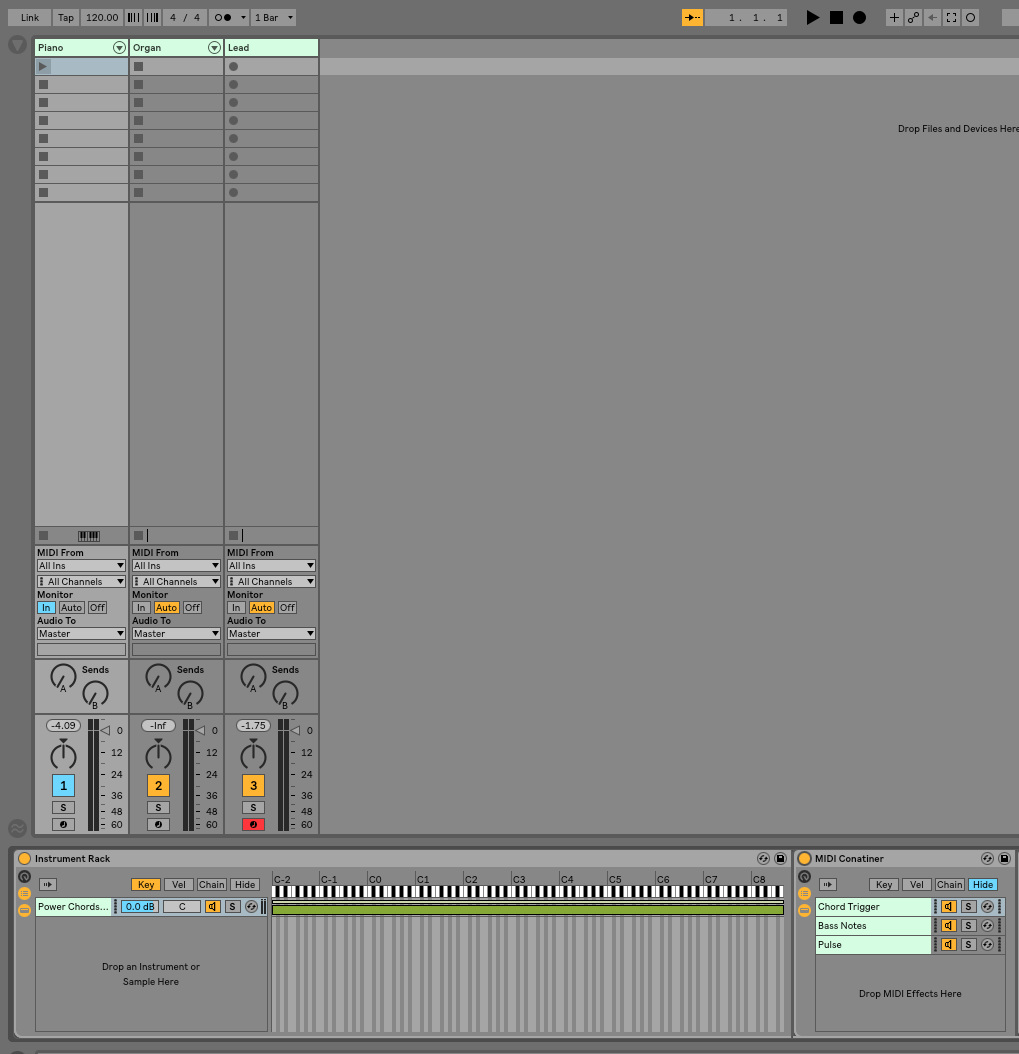
Create three Midi Channels.
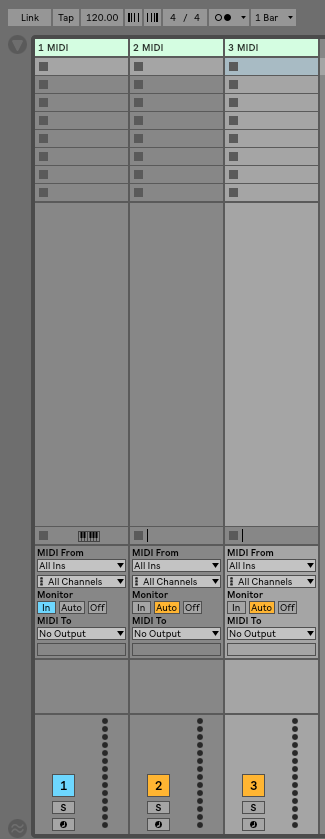
Rename each channel Piano, Organ, Lead synth.

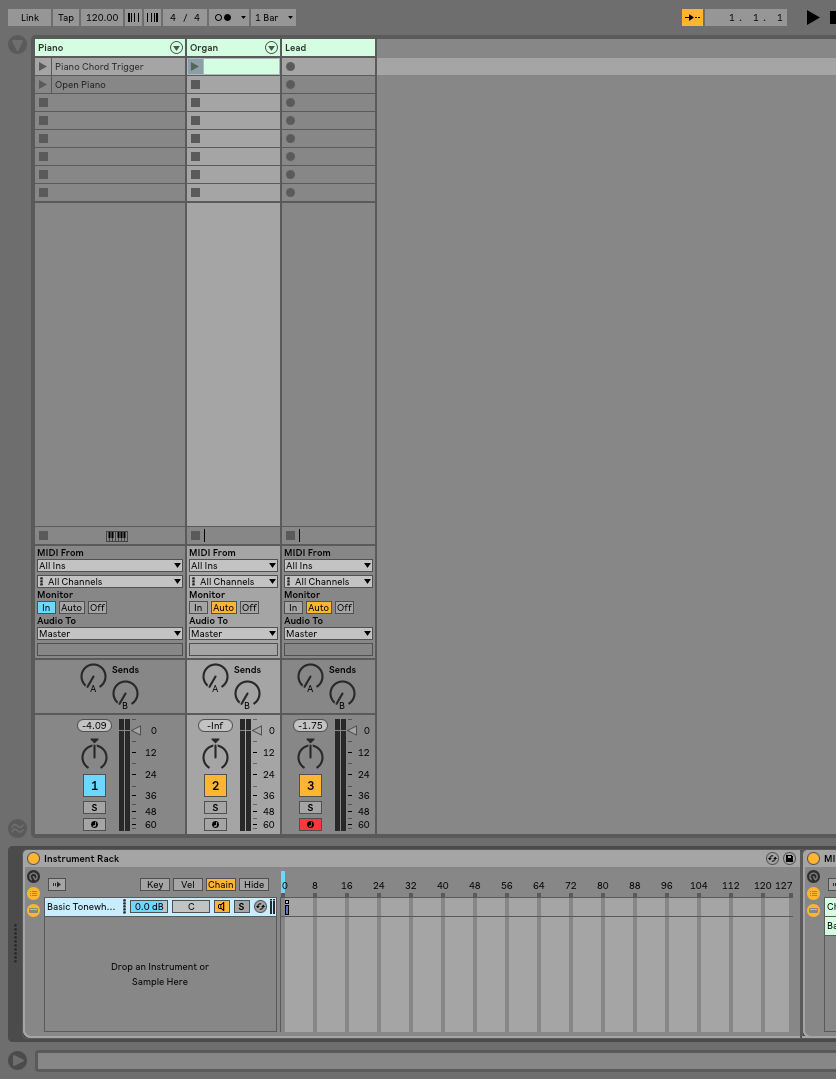
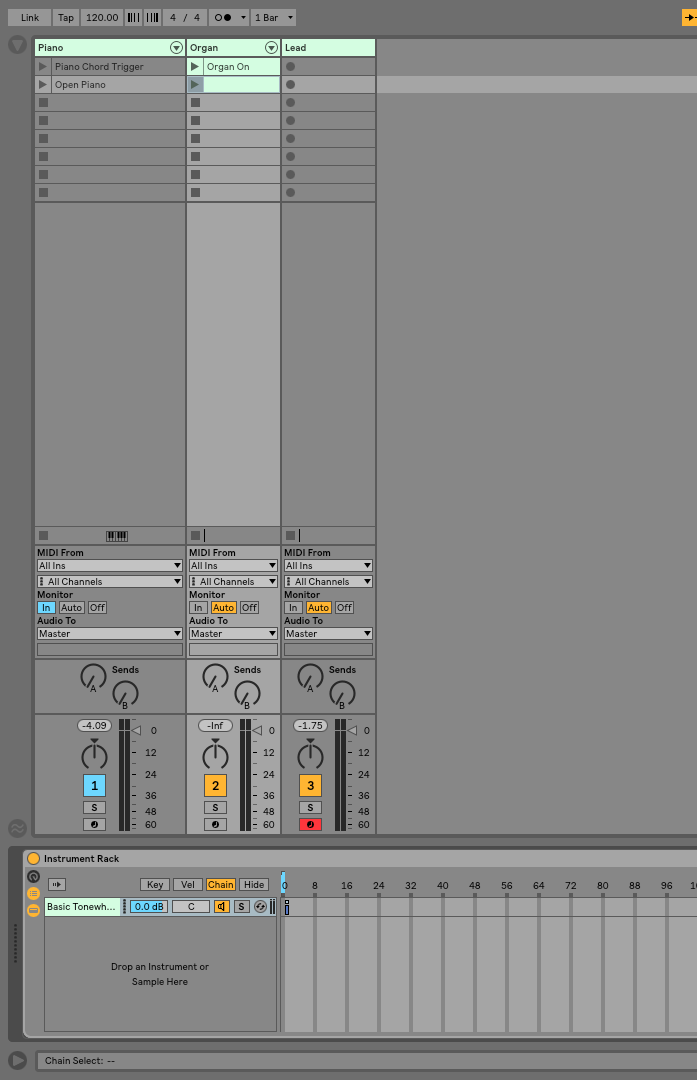
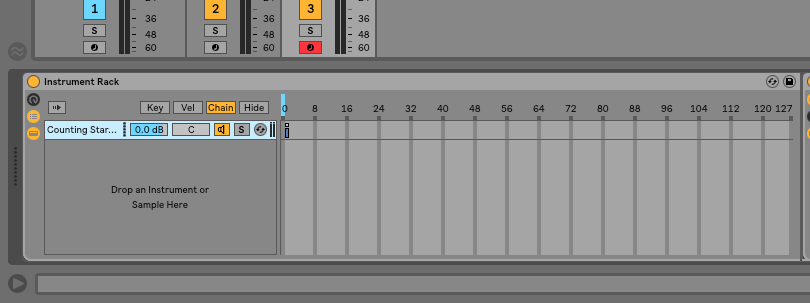
To each channel add an instrument rack.
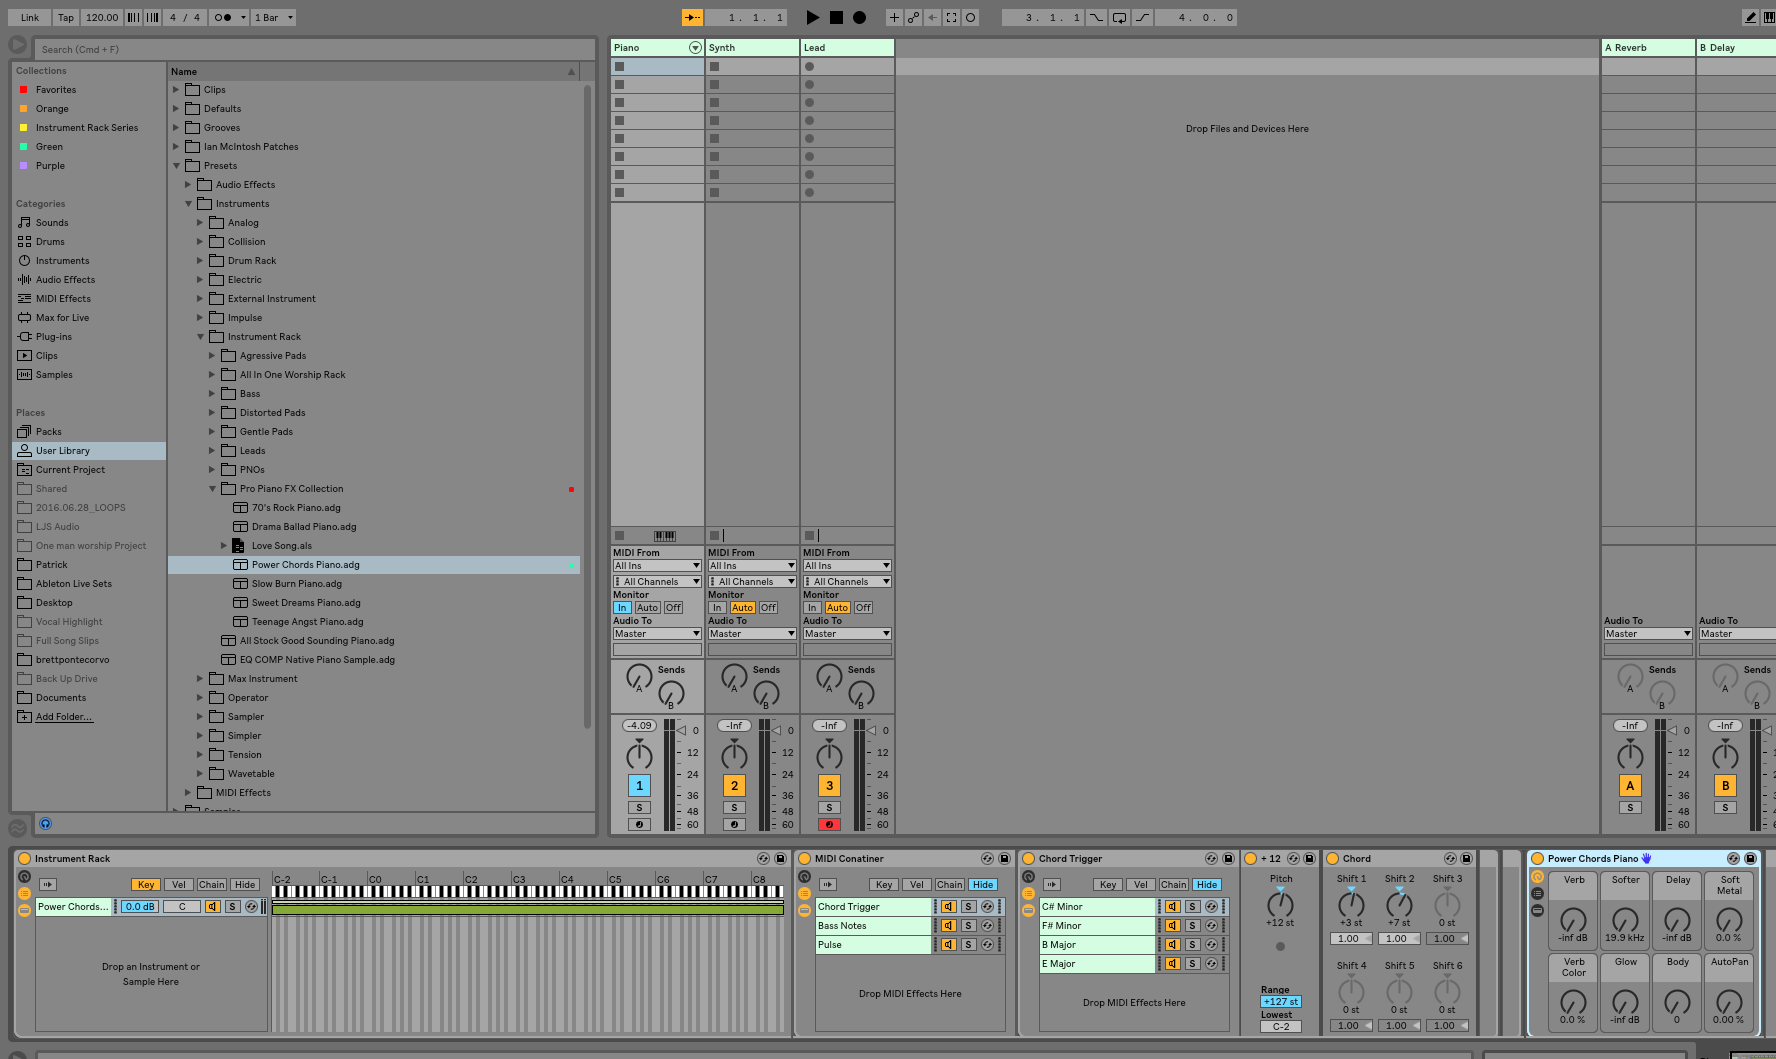
The Piano Patch
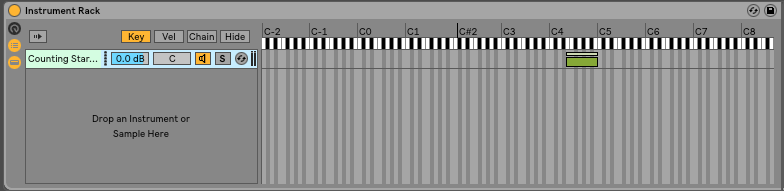
Drop the Midi Container into the instrument rack
Drop your piano sound into the piano instrument rack.
The Organ Patch
Drop the Midi Container into the Organ Instrument rack
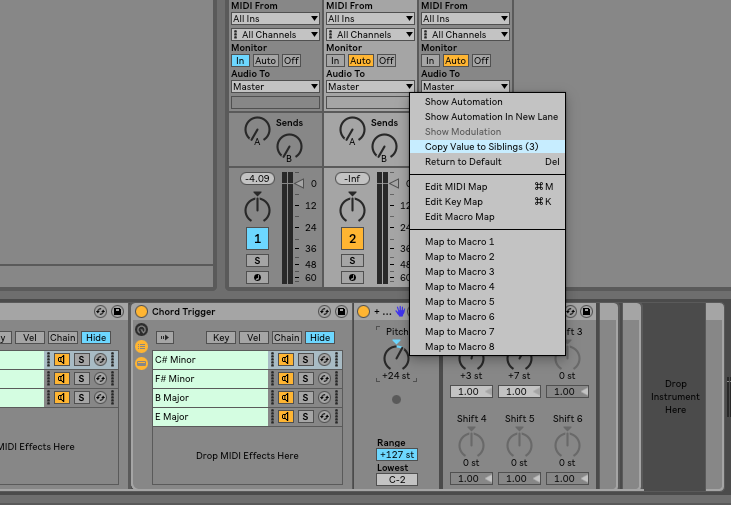
On the Pitch device, change the +12 to +24

Right mouse click the +24 knob and choose, “Copy Value To Siblings”.
Delete the pulse chain from the Midi Container.

Add the Organ Sound to your instrument rack

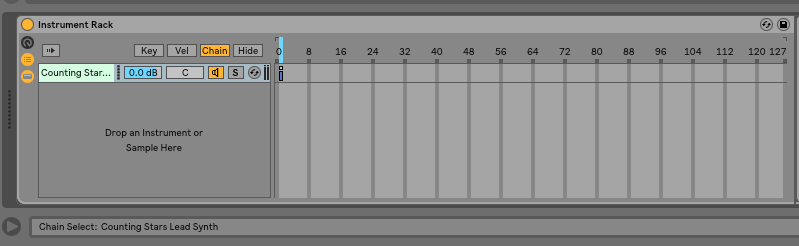
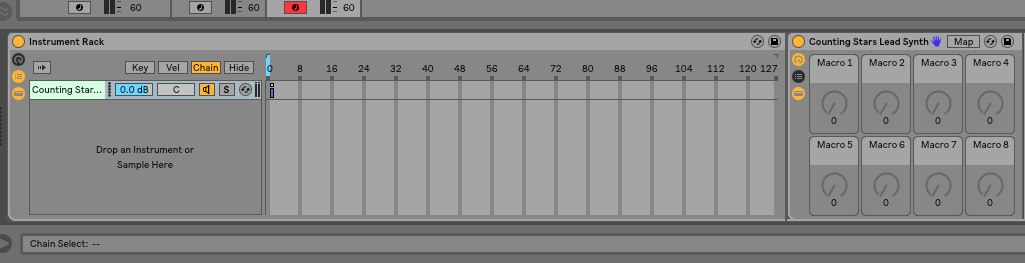
The Lead Synth Patch
Add the lead synth sound to your instrument rack.

Adjust the range in the key menu of the instrument rack to E4-B4
Phase Five: Write Your “Dummy Clips”
Dummy clips allow us to move through different variations in our sound. For example, in this song there are sections where I am playing piano using the chord trigger device, and other times where I am just playing piano without the chord trigger. I will use a dummy clip to turn on and off that function.
The Two Click Method
When writing information into dummy clips, the fastest most effective way to do this is to use the “two click method”.
- Click the parameter to be written.
- Press Shift-Tab.
- Click the dotted line.
It doesn’t get any simpler than that!
Let’s put the two click method to good use.
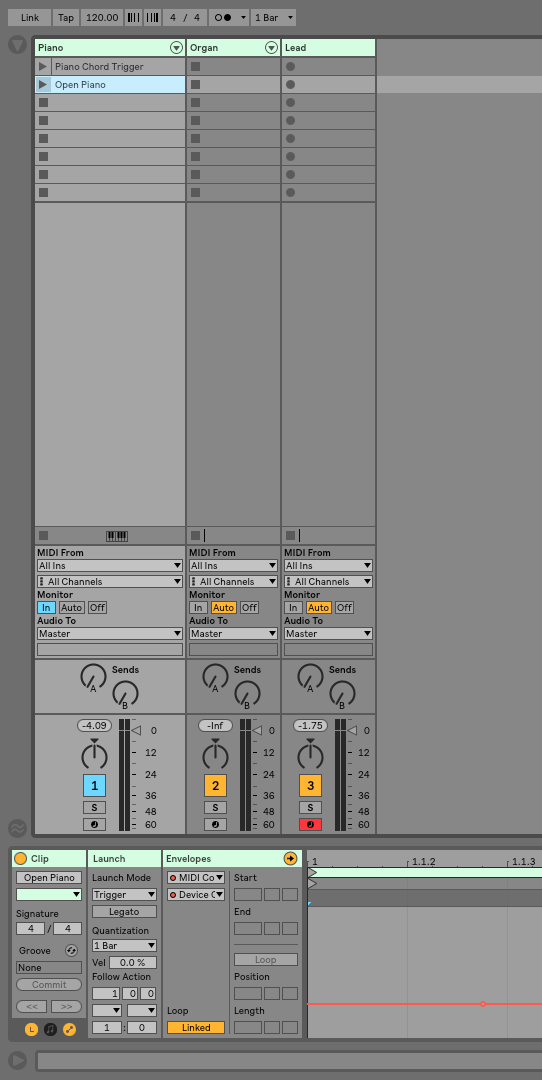
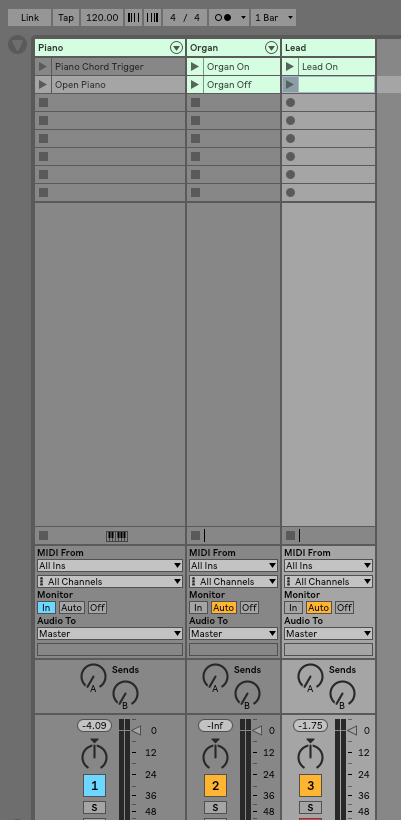
Piano Control Clips
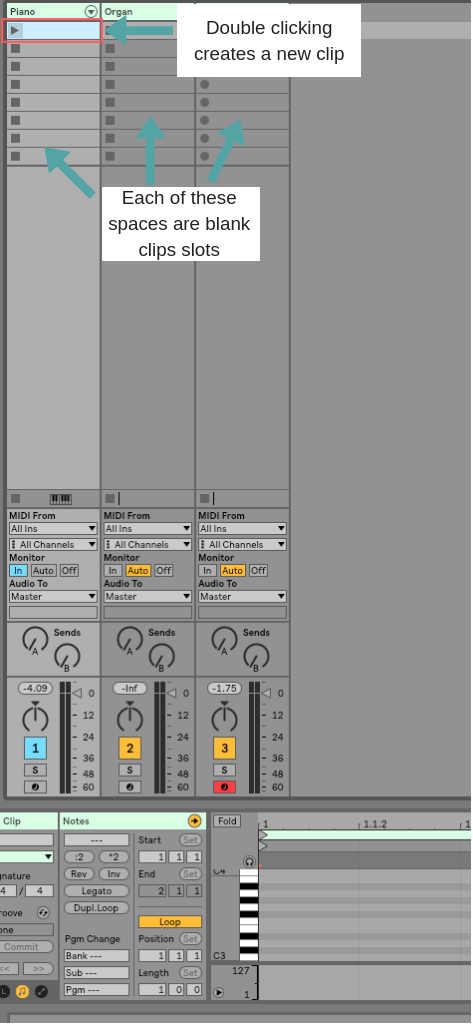
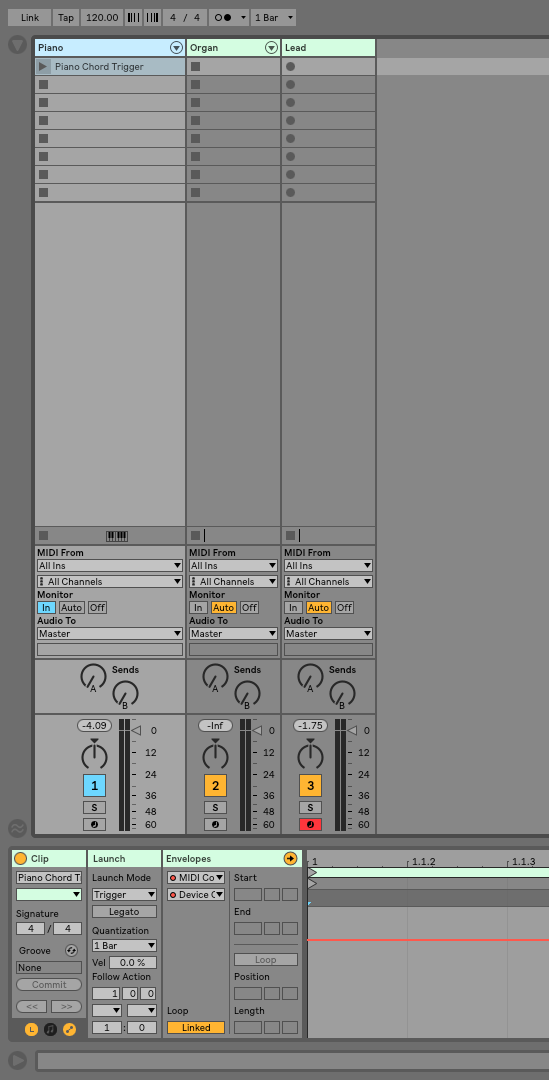
Double click in a blank slot on the piano channel to add a dummy clip.
Press Shift-Tab to reveal device view
Click the Midi Container power button
Rename the clip “Piano Chord Trigger”
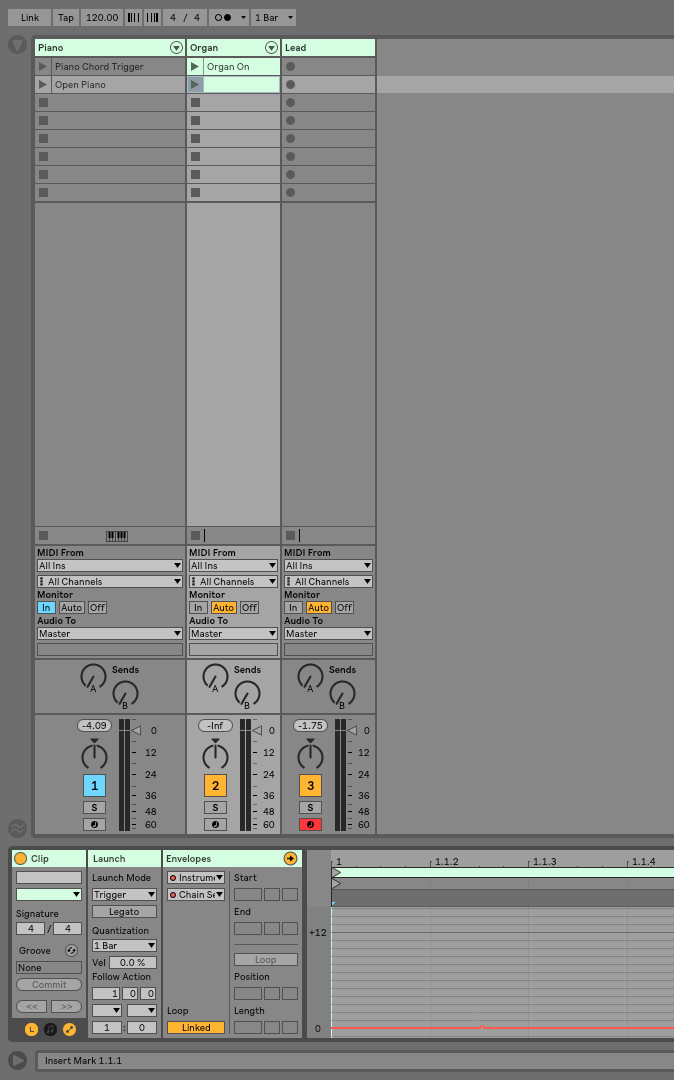
Now lets create a clip so you can play the piano sans chord trigger
Create a new dummy clip in the second slot
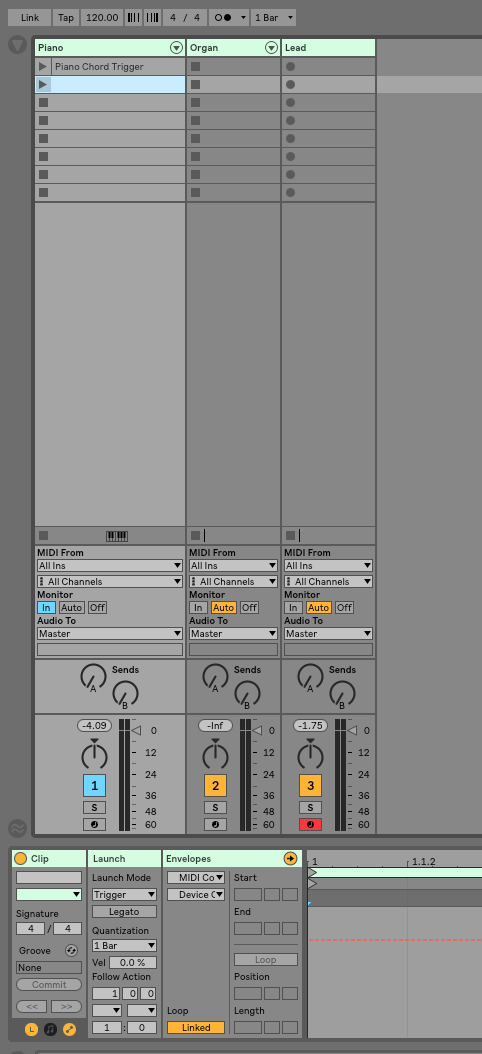
Shift- Tab to reveal device view. Next, turn the Midi Container off by clicking the power button to the top left of the Midi Container.
Press Shift – Tab to reveal clip view. Click the dotted line.
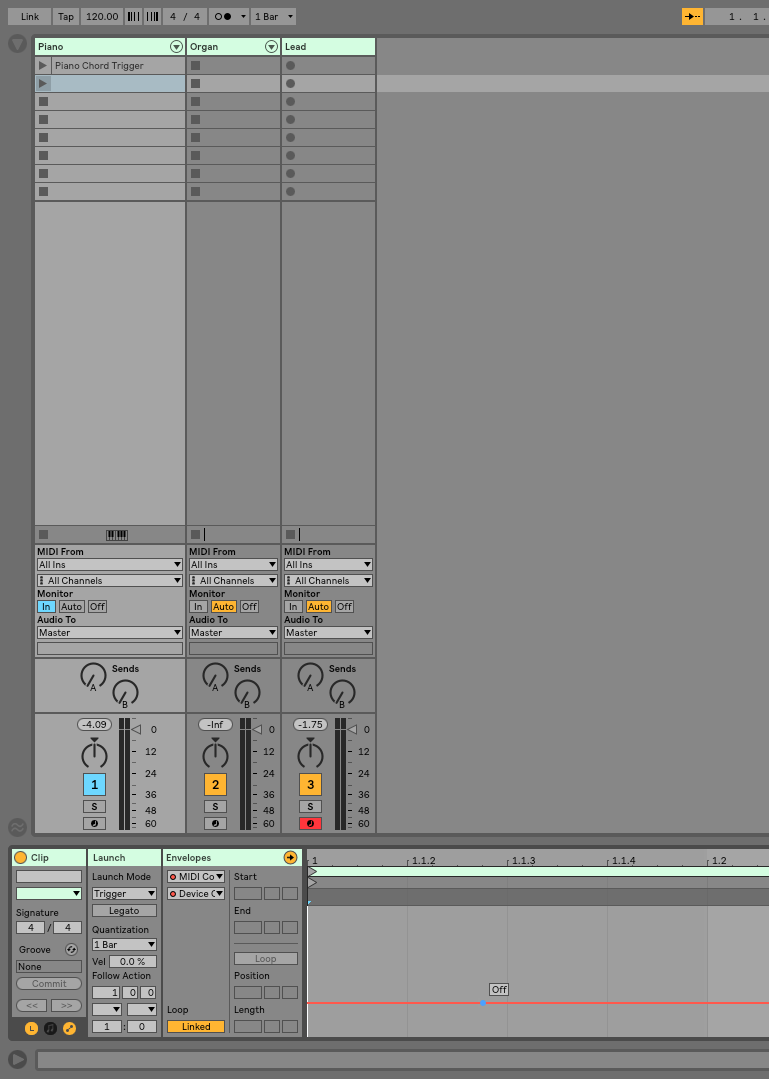
Rename the clip “Open Piano”.
Organ Control Clips
For this song, our organ patch just needs to be turned on and off.
Pro Tip: Rather than use the power button to turn our sounds on and off, which can produce undesirable clicking, we will use the chain selector to stop signal from flowing to the organ.
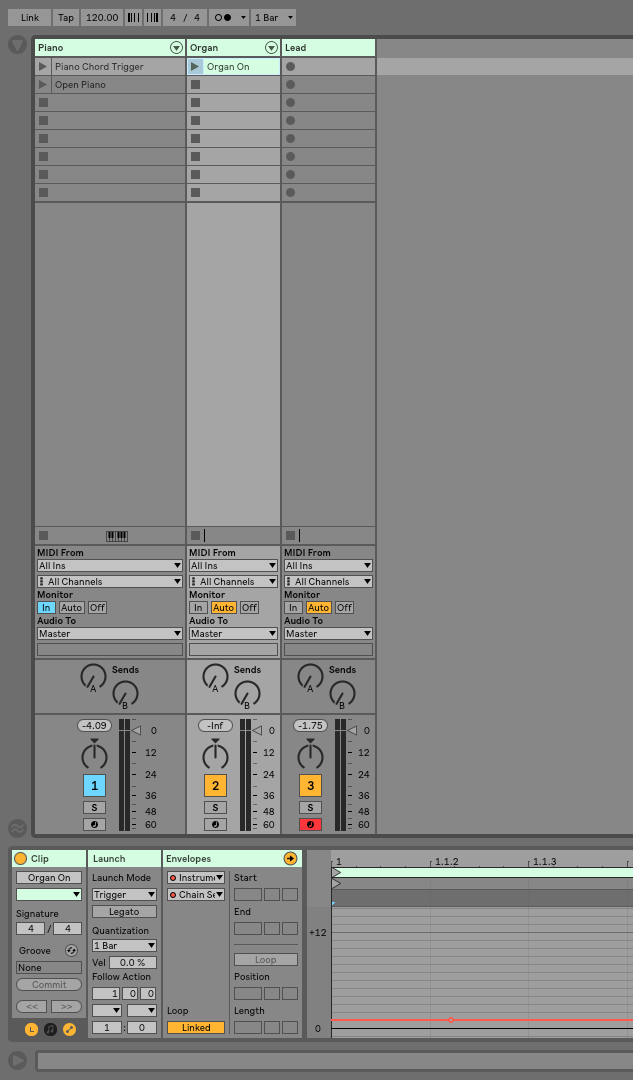
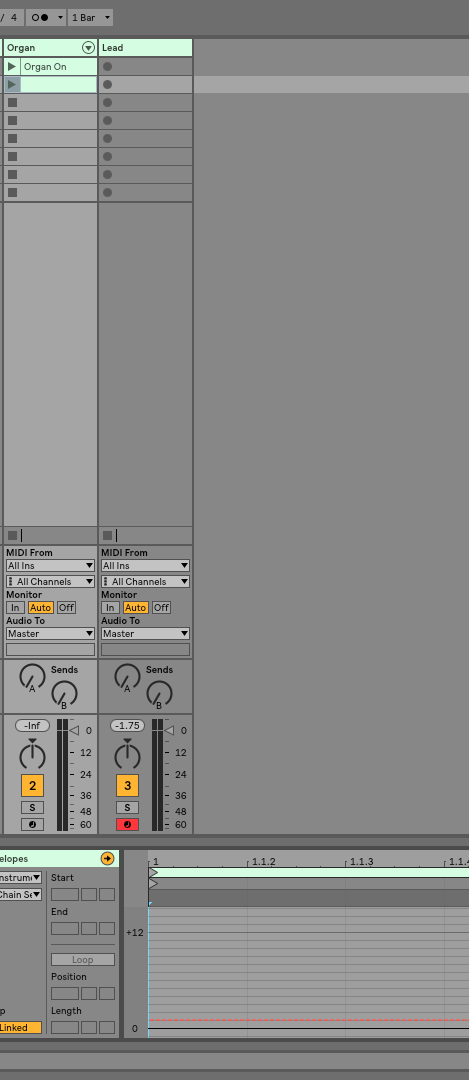
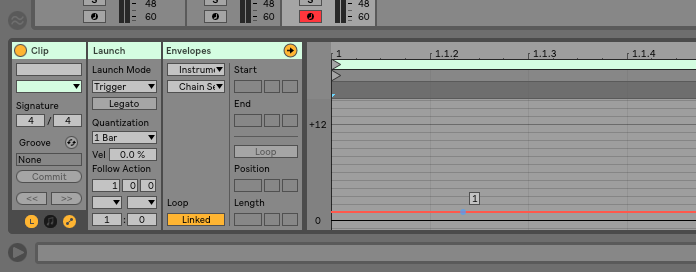
Organ On Clip
From the chain menu, move the organ chain to position 1.
Create a blank clip by
Move the chain selector to position one
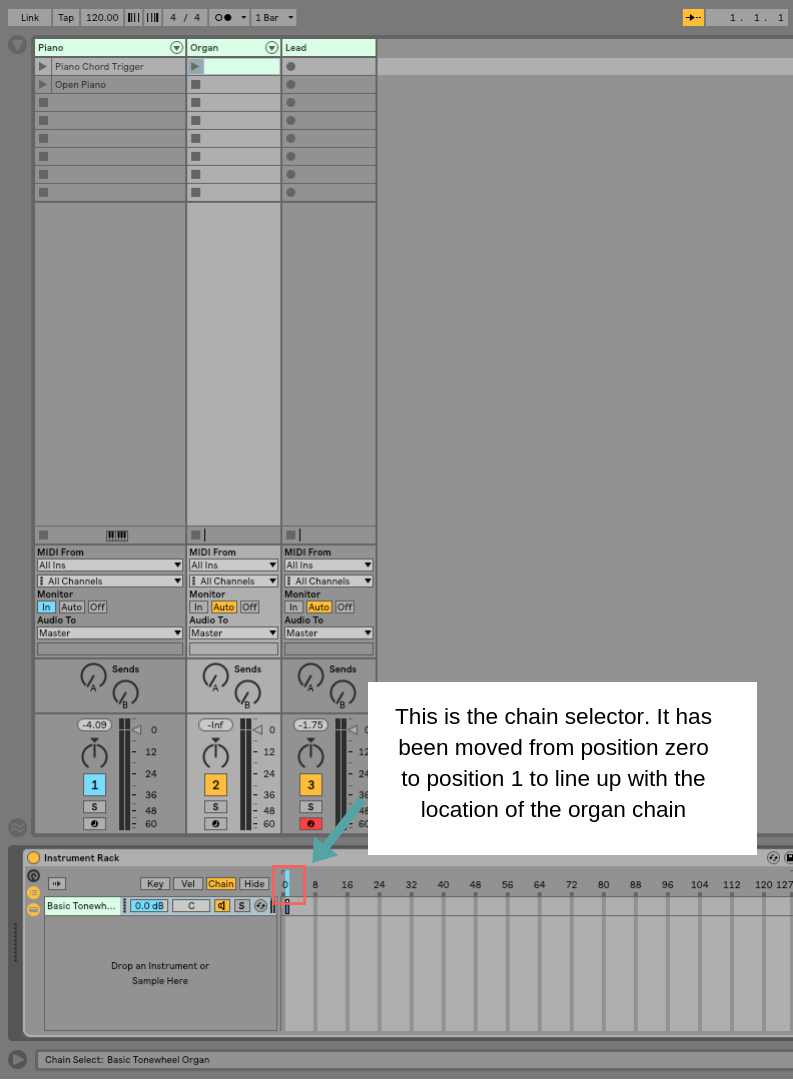
Press Shift – Tab to reveal clip view, and then click the dotted line.
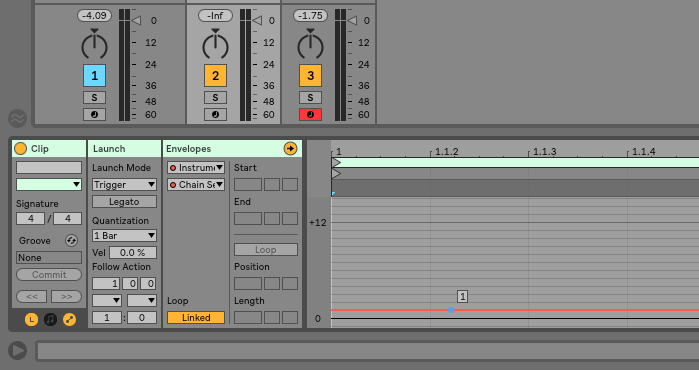
Rename the clip “Organ On”
Organ Off Clip
Create a blank clip by double clicking on an empty slot on the organ channel
Press Shift – Tab to reveal device view, and move the chain selector to position zero.
Press Shift – Tab to reveal clip view, and then click the dotted line.
Rename the clip “Organ Off”
Lead Synth Control Clips
Synth On
In device view, move the synth chain to position 1.
Create a blank clip by double-clicking on an empty slot on the synth channel

rename the clip “Lead On”

Synth Off
Create a blank clip by
Press

Rename the clip “Synth Off”
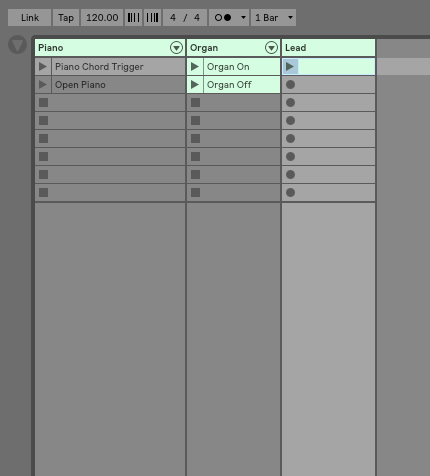
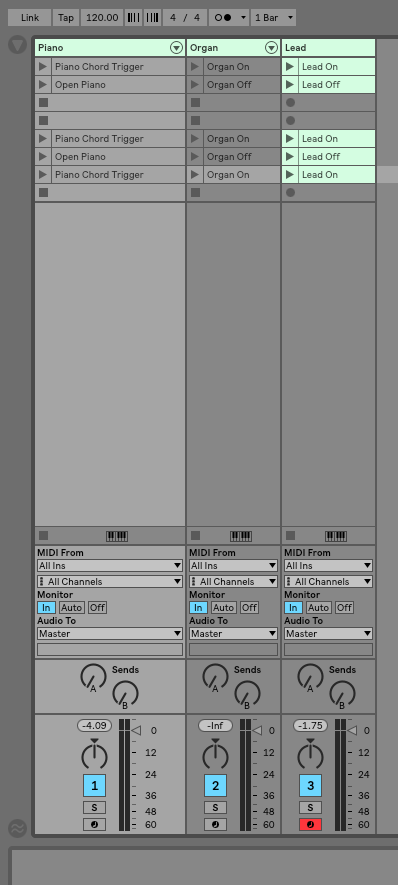
Phase Six: Put Your Control Clips In Order
This is where you will really start to see how you can use Ableton like Mainstage. As we drag our control clips in the right order, the whole screen will start to become a patch list that you will be able to use to recognize where you are in the song.
Leave your control clips at the top where you created them. A few slots down, start building your patchlist by putting your clips in order.
Click and drag the desired clips while holding down option.
Some Notes On Firing Clips
In order to have an easy and happy time moving through your patch list be sure to check the following.
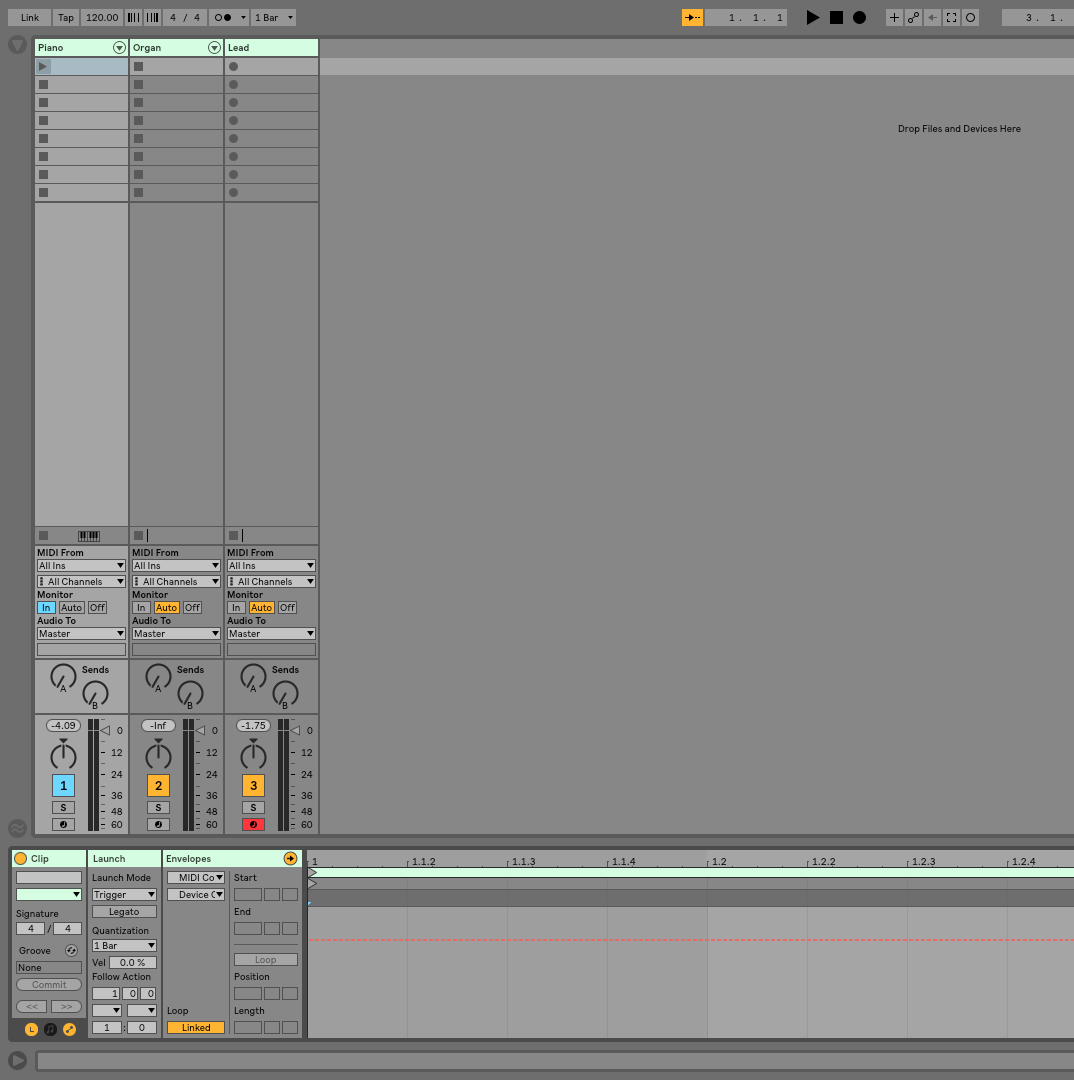
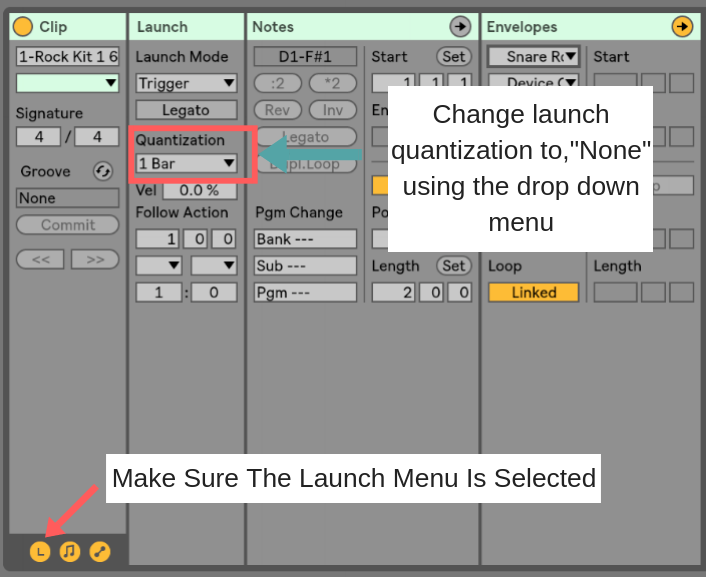
Make sure your clips are not set to quantize.
You can quickly do this by holding pressing, “Command A”, Navigating to clip view by pressing shift-tab, and changing the launch quantization to “none”.
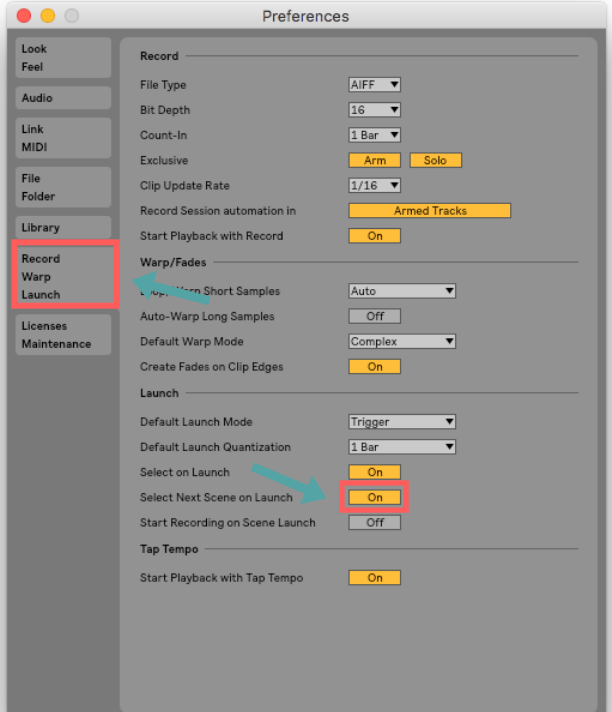
Make sure in the preferences you have the setting, “Select next scene on fire, turned on.
Open preferences
Choose
Turn select next scene on launch, “on”.
Make sure to map an up down and fire key to your controller
Enter Midi Mapping map my pressing command-M on your keyboard
From the master menu, map these three parameters to a button on your controller by clicking each one, and pressing the button you want to use.

Exit midi mapping mode by pressing Command-M
Congratulations! If you made it to the bottom of this page, you have just done a ton of work on your set. You should feel incredible. I want to celebrate with you. Tweet a screen shot of your completed set to @MStoAbleton.
Got more questions? Ask me via email, or through my Facebook group.