Before most music hits our ears, it passes through some sort of a computer program: Protools, Logic, Cubase, Studio One, Ableton, and any of the others I might be missing. Very rarely is anything getting onto our most popular streaming services without being molded in some way by a computer. Even more than that, many of the sounds that we hear in music is created from a digital instrument: Whether it be sampled based, or a synthesizer.
So it seems to logically follow that if you are playing a cover gig, you probably aren’t going to make it through the whole night without having at least some handle on how to make computerized sounds.
That is what this series is about.
What we as keyboard players NEED to know to be able to play live keys.
Today we are focusing on just one piece of what I use to keep my live keyboards sounding fresh and interesting, Reverb
What Is Reverb?
At the simplest level, reverb is used to emulate the sound of a space. For example, reverb takes your piano sound, and puts it into a “Large Hall”, or “Cathedral”.
So rather than hearing, “live piano sound try 56”, you will hear “live piano sound try 56 in a stairwell”
At one point, the sound we now know as reverb was created by piping sound into a room that was fitted with different microphones at varying distances from the signal source. That sound was then mixed back in the original sound and so the listener was able to hear the recorded sound, in a different space.
When you think about it, that is pretty brilliant and really cool.
Reverb Now
Thankfully, we no longer need entire rooms dedicated to creating this sound we now know as reverb. We’ve got tons of plug-ins that emulate that sound for us.
Ableton’s stock reverb is really awesome and I highly recommend getting exceptionally familiar with it before moving on to 3rd party plug-ins.
If you are in a place where you are looking for some good reverbs, I highly recommend Valhalla Vintage Verb. And if you have Max for Live, you must check out convolution reverb pro, which is a part of the Max For Live Essentials Collection.
Goals Of Reverb As An Effect
Remeber this is not a time where we are trying to get the best sounding most pristine reverb. There is certainly a place for that. Today what we are talking about is how to get interesting sounds from a reverb device as an effect to give your piano sound some more mileage.
Goal 1: Create Ambiance
A very wet reverb sound at the top of a set or song can build a tremendous amount of anticipation and excitement.
Goal 2: Add Warmth
A less extreme reverb can make your piano sound a good deal warmer. This can be ideal for ballads. I like to use this in particular when I am trying to frame a singers voice. If there is a particular part of a song where it is really about the words, or about the voice, and I am playing very sparsely, I will throw in just a bit of reverb. It is going to make the singer feel like they have good support underneath them, but the sound that you will be producing will frame them rather than take away from them
Goal 3: Add sustain to unsupported lead lines.
A little bit of reverb goes a long way to really bring out high-end melody lines. I find this to be especially true when you are not doing much in the way of supporting those parts with your left hand.
My Reverb Settings For Piano
Everyone has some ideas about how to best set up your reverb, or whatever other audio effects you may want to insert into this sentance. This is one of the reverbs that I use on my piano channels. At the end of the day, I use it because I like the way it sounds.
My best recommendation to you is to start here, understand why I’ve made some of these choices, and then play with some of the settings to find a sound that you like.
The What’s And The Why’s
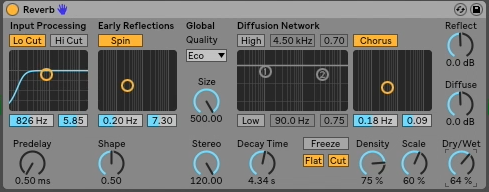
Input Processing: This controls what signal is actually processed by the reverb. You can either take of high end, low end, or a combination of both.
I like to let all of the high-end signal come through the reverb. I like that it allows the shinier qualities of the piano to poke through in the reverb tail.
Spin: Spin deals with the early reflection of the signal. How many times, and at what speed the signal is hitting the walls before it moves on to the decay phase.
I have a pretty tame setting here. But a little bit goes a long way. Try turning the spin all the way up, and you will see what I mean. You will get a ton of detuning and it will sound straight up strange. That being said, a small amount of spin, like above adds warmth to your sound.
Size: This tells Ableton how large your virtual room is.
I like to keep my size turned all the way up. This way when I am trying to create an extremely ambient pad sound, I am able to accomplish that simply by turning my dry/wet mix all the way up.
Stereo: Stereo controls how wide your reverb can sound. At 120, the left and right side of your stereo field receive two different signals.
I keep my stereo turned all the way up because I am really looking for an extreme sound. I could see a situation where you may want something tamer, but In my case, I like it all the way up.
Diffusion Network: The diffusion network allows you to shape the frequencies of your reverb tale. You can boost, or subtract the parts of your reverb frequency that you would like to hear.
I find that I almost always turn this parameter off. I haven’t found it to be helpful enough for me to dial in a setting that I really like. That being said, you can certainly create a darker or light sound, by boosting the mids or the highs slightly, or by taking a little bit more off the low end.
Density and Scale: The higher up you turn these knobs, the darker your sound gets.
With my piano sound, I really prefer a darker warmer tone. So I like to keep these settings in the 60’s and 70’s.
Decay: The amount of time in seconds it takes for the reverb to completely stop sounding.
I absolutely LOVE this at about 4 seconds. It is a longer reverb time, but it adds so much. I’ve tried several other values, but constantly come back to this.
Reverb In Action
In my live setup, I map the Dry/Wet knob to a knob on my controller. Here are some common percentages that I use during a live set, and what I use them for. I demo all of these in the video walkthrough, so be sure to check that out above.
Pad: 100%
I create a nice pad sound by turning my reverb up to 100% and then pressing the freeze button. After that point, you can turn down the mix and continue playing. This is a really nice effect.
Lead Line Support: 30%
If you happen to be playing a lead line part that lives on the top of your keyboard, a nudge up to 30% will give your notes a lot of support. I find that the reverb tail does a lot to give the listeners ear time to grab hold of what you are playing. This is particularly true if you are using longer sustained notes.
Depth In Note Filled Passages: 5%
Songs that have a lot of notes in a short period of time need a lot less in the way of reverb. I leave mine on at 5% because the tales of the reverb make a very nice canvas for playing on top of. The decay almost frames the notes you are playing, even if you are playing a lot of them. Be wary of using much more than 5% though, because with a delay time as long as 4 seconds, it can get very muddy very quickly.
You can download a copy of the above reverb, the very same one I use for all of my live sets here.
If you want an even more complete set of audio effects for keyboard players, The Pro Piano FX Collection comes complete with 8 racked macros designed to make the Ableton preset, “Grand Piano” Sound awesome.