Synth strings are a great sound to have in your back pocket. They are dramatic, can add a ton of ambiance and vibe, and are just a generally helpful sound to get a handle on.
For this post, I am using Ableton’s built-in synth “Wavetable”, but no matter which synth you have access to, so long as it’s a subtractive synth it will work much the same way.
Building Synth Strings
Oscillators
Since I am using wavetable, I have the luxury of choosing a string-based wavetable. If you aren’t using this device, choosing two saw waves will work just fine.
Be sure to slightly detune your Oscillators to create the feel of a string section. You can watch my process in the youtube video, but so you have a jumping-off point, there are the oscillator settings I came up with.

Envelopes
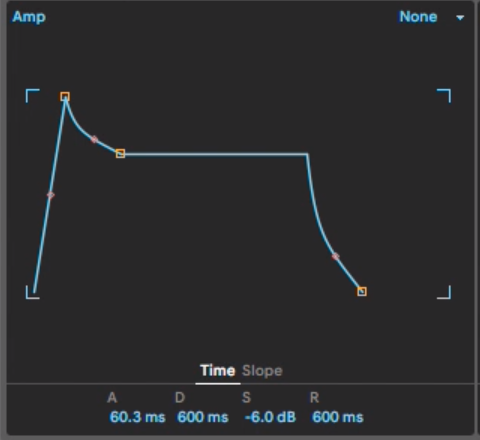
Amp Envelope
Attack
I am making a legato string patch. So I want a gradual somewhat slow attack on my amp.

By the way, if you want a Quick Synth Map to remember the parts of a synth, you can grab it here.
Decay
Since I’m imitating a bow, there will be a small and gradual decay to only a slightly lower volume.
Sustain
I set my sustain to -6 dB because it is slightly less than it’s the peak, but not much less.
Release
Quick-release to account for the way a string resonates after you cut off.
Filter envelope
Using the same Envelope shape, apply a little bit to the LPF to imitate the initial sound of a bow
LFOs
In this patch, I use the LFO to serve three distinct purposes:
- Slowly change the wavetable position, creating an organic and evolving sound
- Gradually alter the pitch, creating a larger, more ensemble like sound
- To add vibrato, triggered by aftertouch (So the vibrato only happens when you want it to.
The video talks about all of these applications in detail, but I am want to focus on the vibrato application here.
Setting Up The Matrix
Creating The Vibrato Aftertouch Trick
The goal is to have vibrato happen only with aftertouch. To achieve this, you’ll need to set up two parameters.
Start by assigning LFO to the master pitch, but only a tiny bit. (less the 1 percent)
Now, assign aftertouch to the “amount” parameter on the LFO. Use a very high value (100% will work in most cases)
This essentially makes it so that the LFO amount will be zero until aftertouch is applied.
How To Move Forward?
Make sure you grab a copy of the Quick Synth Map
Make sure you connect with me on my Facebook Group
