Writing dummy clips is essential for working in Ableton, especially in session view.
Dummy clips can have many functions. We can use them for patch changes like described in this post. You can use them to create that sort of “Jump to” functionality the way you are able to in Mainstage. You can also use them to adjust the range of keyboard
No matter what way you cut it, you will be putting information into dummy clips within Ableton, and so it’s really important that you are able to do it quickly and efficiently.
The Two Click Method
The two click method of writing dummy clips actually has four steps. It’s a great
Make sure you are plugged in so that you have access to all of my time-saving tips by signing up for my newsletter. That way you don’t miss anything that can speed up your work flow.
The two click method works like this:
- Create a dummy clip
- Click on the parameter you wish to map
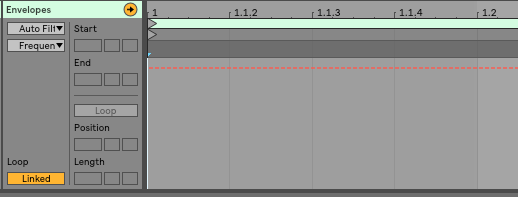
- Press Shift-Tab to switch to envelop view
- Click the dotted line
Pro Tip
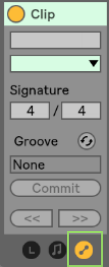
If you aren’t seeing the envelopes after you hit shift-tab, you may need to unhide it by clicking on the little envelope show hide button.
Step By Step In Context
For Patch Changes – Getting Set Up
Step One
Insert an instrument rack onto a default midi channel strip

Step Two
Add all of the instruments you would like to use. For this example, I’m using two types of layered pianos, and a thick pulsing pad.

Step Three
Move each instruments chain to a separate location on the X-axis. Remember, chains taking up the same x-axis location can be used for instrument layering.

Using The Two Click Method
Step One
Create a new dummy clip by double-clicking in an empty click slot.

Step Two
Move your chain selector to the position of your first sound. (Click one)

Step Three
Press Shift-Tab To reveal the Clip View
Step Four
click the dotted red line in the clip detail so Ableton knows where to move your chain selector when that clip is fired. (Click Two)

Pro Tip
Make sure your clips quantization is set to none so your patches change immediately.

For Effect Changes
Step One
One whichever parameter you would like to automate, Click and set the desired effect.

Step Two
Press Shift-Tab To reveal Clip View
Step Three
Click the dotted line to write the automation
Now get out there and start creating.
Make sure you are a part of the Mainstage To Ableton community by signing up for my mailing list. Every single Tuesday and Saturday I release new tips, tricks, tutorials, and information that you will want to get your hands on.
When you sign-up, I will send you the fast track patch list guide, and every once in a while, I send free Ableton specific goodies reserved only for the MStoAbleton community, so make sure you don’t miss anything.
Looking forward to connecting with you!
until next time,
-Brett
I’m new to you site and it’s exactly what I needed as I transition from Mainstage to Ableton. I especially love the step by step screenshots in your tutorials. That helps me so much! I typically watch the videos on my iPhone but the video is so small, even in landscape mode, that I can’t tell what’s happening on the screen. Even if I were to watch it on my iPad or laptop, it goes by so fast on most videos that I often can’t tell what they’ve selected. With your screenshots, and I don’t know anyone else who goes to that much trouble on their tutorials, I’m able to enlarge it and study it so I know exactly what you clicked on. Thank you so much! Looking forward to watching all your tutorials!
Hey Laura!
Thanks for the comment! So glad it’s helpful for you! Happy to have you here!