Although Ableton has an extensive library of synths and audio effects, there will surely come a time where you want to use some third party devices.
Many times, there devices are more specialized than what Ableton provides, and while I believe Ableton’s native devices are exceptional, there are occasions where it makes sense to use an outside source to acquire something either of higher quality, or with a more streamlined workflow.
In the case that you are using something outside of the native tool box, you will want a way to control parameters easily without needing to open a pop out window.
Accessing The “Configure” Button
Once a third-party VST is loaded in, you will need to configure which parameters you want to control. You can do this by:
- Pressing the open arrow
- Clicking Configure
Once this is done, your VST will open .
In configure mode, anything you click on will be added to the configure panel below. You will know it worked if you see a green parameter appear on screen.
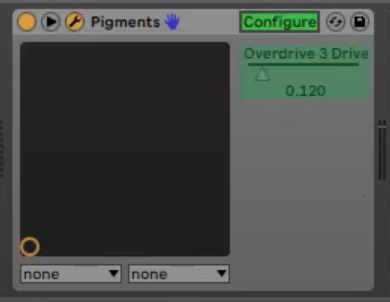
Once you have finished choosing the parameters you want to be able to control, you can click configure to exit this mode.
How To Control Your Mappings
Once you have completed the above process, you have two options:
You can control these parameters using midi mapping. This is best for live performance. I detail that in this post:
Additionally, you can control these parameters using clips. The details for this process can be found in the post, outlining the “two-click method”
Go Further
If you are playing keyboards live, you will want to have a handle on sound design. Make sure you grab a copy of the quick synth map. This will help you get a handle on the basics of sound design.